Get the Theme now 39$
Phox

Fully Documentation

Installation

Uploading Phox via FTP to WordPress

  1. Download the zipped theme pack to your local computer from themeforest and extract the ZIP file contents to a folder on your local computer.
  2. In the extracted folder you will find 'Phox.zip' Extract this file .
  3. Using an FTP client to access your host web server.
  4. Upload the Theme files in the extracted folder called 'Phox' to (/wp-content/themes/) directory provided by WordPress.
  5. Visit WordPress Dashboard > Appearance > Themes, then click the Activate on Phox theme.

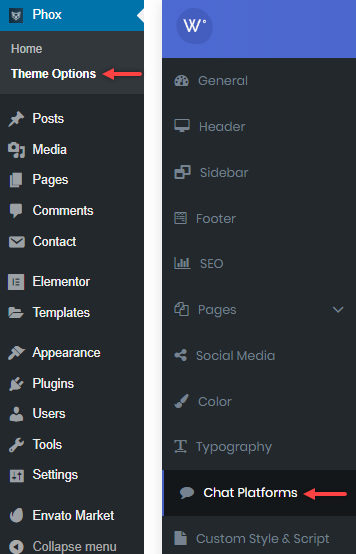
Installing Phox From the WordPress Dashboard

  1. Download the zipped theme pack to your local computer from themeforest and extract the ZIP file contents to a folder on your local computer.
  2. Log into your WordPress admin panel and click on the “Appearance” tab.
  3. Now click on the "Add New" tab.
  4. Click on the "Upload Theme" button, "Browse" for file called Phox.zip in the extracted folder select "Open".
  5. Click the "Install Now" button.
  6. Activate the theme from this page, OR "Return to Themes Page" and activate from there.


Plugins Installation & Import Demo content

Plugins Installation


Import Demo content


To use this theme you must be running at least WordPress 4.9, PHP5.6, mysql 5 or higher. If you use low-end hosting with limited resources (e.g. GoDaddy!), you may experience issues with "one-click" demo data installation feature. We recommend that you contact your web hosting service provider to make sure that your server PHP configuration limits are as follows:

max_execution_time 180 memory_limit 256M post_max_size 8M upload_max_filesize 8M

f you are running unmanaged dedicated server or VPS, you should check your php.ini file. Alternatively, you can edit .htaccess file in the root of your website and add the following values:

php_value max_execution_time 180 php_value memory_limit 256M

php_value post_max_size 8M php_value upload_max_filesize 8M

Setting these values will ensure you will not get error messages during the installation. To safeguard your website, please use secure passwords and the latest version of WordPress and plugins.

Elementor

just drag the element you want to add and drop it in a page then customize its setting as your preferences. You will have plenty of default elements to add or you can add our developed elements those are only for Phox theme from the Phox ELEMENTS tab on the elementor.

How To Use Elementor - Building Your First Pages


Titles


Pricing


Forms


Tabs


Accordion


Carousel


Dividers


Partners


Features


Maps


Mobile App


Social


Buttons


Alerts


General Settings

How to set up some general options for your site including the following:

Layout

Layout
  1. Layout - choose Boxed and Full width layouts
  2. Background Patterns - Patterns works only in Boxed Layout

Logo

To set up logos, please navigate to Appearance > Phox Options > General > Logo section.You can also set up additional logo options. Note: Retina Logo should be always 2x larger than Custom Logo (this field is optional). This section contain the following options:
logo
  1. Upload Logo - here upload regular logo
  2. Retina Logo - should be always 2x larger than Regular Logo
  3. Height - Add custom height to logo image
  4. Text Logo - if you prefer to use simple text logo instead of image, this is the right place to do this
  5. Logo Size - Add Font size to Text logo
  6. Favicon - upload your custom favicon image in .ico format

Information Box

info
  1. Email - your company email
  2. Phone - your company phone number
  3. Live Chat link - Direct Chat Link
  4. Company Location - Type your Company Location

Google Maps

api
  1. Google Maps API - If you are generating a large volume of queries to the Google Maps API please Get an API key

Header

Header is an important theme feature, and is what users see first.

General

Header
  1. Display Login Button - Turn on to display login button on header
  2. Login Url - Set Login Url
  3. Display cart Button - Turn on to display cart button on header
  4. Cart Url - Set Cart Url
  5. Display Search Button - Turn on to display search button on header

SEO

How to set up options relating to SEO ready

GOOGLE

Layout
  1. Google Analytics - paste your Google Analytics code to track your site
  2. Google Remarketing - paste your Google Remarketing code to add potential customers to Google list

SEO FIELDS

Layout
  1. Use theme SEO fields - if you are using external SEO plugin you can easily turn off built-in SEO option
  2. Meta Description - this is meta description for homepage;also a default description for each page added in Pages section
  3. Meta Keywords - meta keywords for homepage; also default keywords for each page added in Pages section

Blog

Options relating to blog pages only:

Layout

Layout
  1. Layout - choose a blog layout (Classic, Grid)

Options

Options
  1. Blog Page Title - Set Page Title for Blog
  2. Excerpt Length - number of words visible in blog page excerpt
  3. Featured Image - turn ON/OFF to show Featured Image
  4. Hide Category - turn ON/OFF to show Categories
  5. Hide Post Date - turn ON/OFF to show Post Date
  6. Hide Author - turn ON/OFF to show Author

CATEGORIES BAR

Categories Length
  1. Categories Length - Set Categories Length

PIN POSTS

PIN POSTS
  1. Pin Posts Layout - choose a pin posts layout (Left, Right, Center)

Single

GENERAL SETTINGS

Single
  1. Hide Sidebar - turn ON/OFF Sidebar for single post
  2. Hide Post Date - turn ON/OFF Post Date for single post
  3. Hide Post Author Box - show author box under single post page
  4. Hide Featured Image - turn ON/OFF Featured image for single post
  5. Hide Category - enable/disable comments for single post pages
  6. Hide Tag - turn ON/OFF Tags for single post
  7. Hide Comments - turn ON/OFF Comments for single post
  8. Hide Social Share Links - turn ON/OFF Social Share Links for single post

404 Page

Layout

Layout
  1. Hide Header - turn ON/OFF Header for 404 page
  2. Hide Footer - turn ON/OFF Footer for 404 page
  3. Background Color - Choose Background color, Then Notice that you should change entry color
  4. Background Image - Choose Background Image, Then Notice that you should change entry color
  5. Main Color - Set Main entry color
  6. Description Color - Set Description entry color

PAGE OPTIONS

Options
  1. Main Title - Set Page Title for 404
  2. Description Title - Set Page Description for 404

Coming Soon

LAYOUT

Layout
  1. Background Color - Choose Background color, Then Notice that you should change entry color
  2. Background Image - Choose Background Image, Then Notice that you should change entry color
  3. Entry color - Set Main entry color

Page Options

Options
  1. HomePage redirect Button - Redirect to the HomePage
  2. Text To Display - By default : We're Launching Soon
  3. Description To Display - Set Main entry color
  4. Date for countdown - Follow this Format, "F d, Y H:i:s" for example "Nov 12, 2019 11:10:20"

Social Media

How to set up options relating to social sites.

SOCIAL NETWORKING ACCOUNTS

Accounts
  1. Facebook - link to your facebook profile
  2. Twitter - link to your twitter profile
  3. Google + - link to your Google + profile
  4. Skype - link to your skype profile
  5. YouTube - link to your youtube profile
  6. Vimeo - link to your vimeo profile
  7. Instagram - link to your Instagram profile
  8. Pinterest - link to your Pinterest profile
  9. Dribbble - link to your Dribbble profile
  10. Behance - link to your Behance profile
  11. Flickr - link to your flickr profile
  12. Tumblr - link to your Tumblr profile
  13. LinkedIn - link to your LinkedIn profile

Colors

HEADER

Header
  1. Header background - enter header section background color
  2. Top Bar Left background - enter Top Bar Left background color
  3. Top Bar Left Text Color - enter Top Bar Left Text color
  4. Top Bar Right background - enter Top Bar Right background color
  5. Top Bar Right Text Color - enter Top Bar Right Text color
  6. Top Bar Right Text Color Hover - enter Top Bar Right Text Hover color
  7. Subheader background - enter Sub-header background color
  8. Subheader Menu Color - link color for submenu section
  9. Subheader Menu Color Hover - link for submenu section on hover
  10. Subheader Menu Active Color - enter link color for active menu item
  11. Sub Menu Background Hover - enter Background Color for Sub Menu link

HEADINGS

Headings
  1. Heading H1 color - text color for h1
  2. Heading H2 color - text color for h2
  3. Heading H3 color - text color for h3
  4. Heading H4 color - text color for h4
  5. Heading H5 color - text color for h5
  6. Heading H6 color - text color for h6

SHORTCODES

SHORTCODES
  1. Best Features Section Gradient - Choose Left and Right Background Gradient Colors
  2. Best Features Section Text Background - Choose Features Text Background Color
  3. Domain Register Button Background - Set Domain Register Button Background
  4. Plan Layout 1 Popular Plan Button Background - Set Plan Layout 1 Popular Plan Button Background
  5. Plan Layout 1 Popular Plan Button Text Color - Set Plan Layout 1 Popular Plan Button Text Color
  6. Plan Layout 1 Order Button Background - Set Plan Layout 1 Order Button Background
  7. Plan Layout 1 Order Button Text Color - Set Plan Layout 1 Order Button Text Color
  8. Plan Layout 3 Title Background - Set Plan Layout 3 Title Background
  9. Plan Layout 3 Order Title Text Color - Set Plan Layout 3 Order Title Text Color
  10. Plan Layout 3 Order Button Background - Set Plan Layout 3 Order Button Background
  11. Plan Layout 3 Order Button Text Color - Set Plan Layout 3 Order Button Text Color
  12. Plan Layout 4 Head Background - Set Plan Layout 4 Head Background
  13. Info Box Title Color - Set Info Box Title Color
  14. General Elements Text Gradient - Set General Elements Text Gradient
  15. General Elements Background Gradient - Set General Elements Background Gradient
  16. FAQ Head Background - Set FAQ Head Background

FOOTER

FOOTER
  1. Footer Top Bar Background - Set Footer Top Bar Background
  2. Footer Top Bar Text Color - Set Footer Top Bar Text Color
  3. Footer Heading color - Set Footer Heading color
  4. Footer Text Color - Set Footer Text Color
  5. Footer Link Color - Set Footer Link Color
  6. Footer Hover Link Color - Set Footer Hover Link Color
  7. Footer News Letter Text Input Background - Set Footer News Letter Text Input Backgroun
  8. Footer News Letter Submit Input Background - Set Footer News Letter Submit Input Background
  9. CopyRights Bar Link Hover - Set CopyRights Bar Link Hover
  10. CopyRights Bar Link Hover Border Color - Set CopyRights Bar Link Hover Border Color
  11. CopyRights Top Border Color - Set CopyRights Top Border Color

Typography

Menu

Menu
  1. Menu Typography - These settings control the typography for all Menus.

Blog

Blog
  1. Post Title Typography In Blog Page - These settings control the typography for all Post Title.
  2. Post Title Typography In Single Page - These settings control the typography for all Post Title.

Body

Body
  1. Paragraph Typography - These settings control the typography for all Paragraph.
  2. Blockquote Typography - These settings control the typography for all Blockquotes.
  3. Links Typography - These settings control the typography for all Links.

Headings

Headings
  1. Heading H1 Typography - text Typography for h1
  2. Heading H2 Typography - text Typography for h2
  3. Heading H3 Typography - text Typography for h3
  4. Heading H4 Typography - text Typography for h4
  5. Heading H5 Typography - text Typography for h5
  6. Heading H6 Typography - text Typography for h6

Chat Platforms

Navigate to Phox > Theme Options > Chat platforms

chat

For Tawk.to users

  1. Select Tawk - from choose the platform block
  2. Navigate to Tawk Dashboard - click on setting icon "Admin"
  3. from Direct Chat Link - copy your API Key
  4. insert API Key - into Tawk API Field
  5. Save
chat chat chat

For intercom.com users

  1. Select intercom - from choose the platform block
  2. Navigate to intercom Dashboard - from your profile picture click on settings
  3. Navigate to Installation - Web
  4. from script - copy your API Key "api_id"
  5. insert API Key - into intercom API Field
  6. Save
chat chat chat chat chat

Custom Style & Script

How to create your own CSS & JS

CSS

Css
  1. Always create/paste custom CSS here. Make sure CSS is error free.

JS

JS
  1. Always create/paste custom JavaScript here. Make sure JavaScript is error free.

Import & Export

This information will be especially helpful for those who wish to move settings from theme options panel between themes, or move a website from a test server to a live server. There are several ways to import or export settings. You can also Reset settings to default to make your theme look like the one on our demo version.

Export

export
  1. Here you can download your themes current option settings.

Import

import
  1. WARNING! This will overwrite all existing options, please proceed with caution!

Reset

Reset
  1. WARNING! This will overwrite all existing options, please proceed with caution!

Support

Note
You can request for support via email or themeforest comments

Copyright © 2018 WHMCSdes. All Rights Reserved